
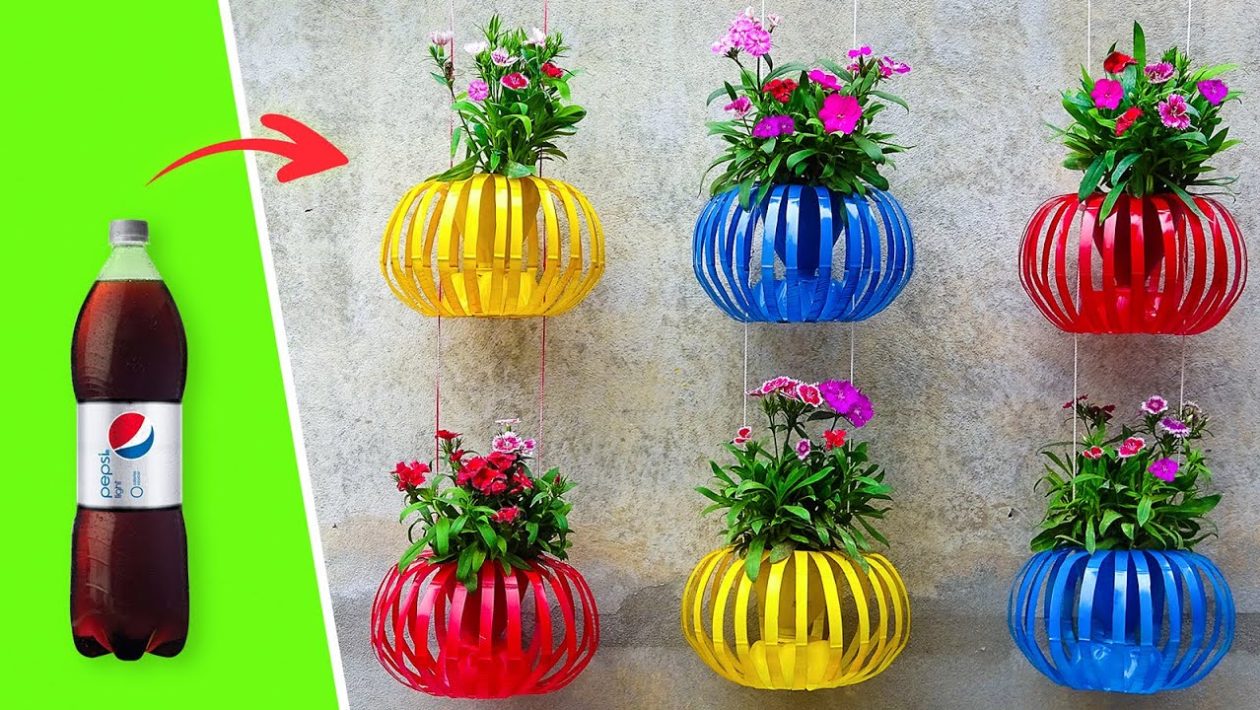
Transforming Old Walls with Upcycled Plastics
Bare, weathered walls often turn into neighborhood eyesores. Instead of spending a fortune on exterior paint or expensive trellis systems, you can transform these empty vertical spaces using common household waste.
Empty plastic bottles offer the perfect raw material for a DIY vertical garden. By cutting them into hanging lantern-style planters, you solve two problems at once: keeping single-use plastics out of landfills and bringing lush greenery to a dead space.
The lantern design is both highly functional and visually striking. It utilizes the structural integrity of the bottle while providing ample airflow, targeted watering, and room for trailing plants to cascade downward.
Materials You Need to Get Started
This project requires minimal tools and relies almost entirely on items you likely already have at home. Standard two-liter soda bottles work best due to their size and durability.
- Empty plastic bottles: Rinsed thoroughly with labels removed.
- Utility knife or sharp scissors: For making precise cuts.
- Heavy-duty twine or weather-resistant wire: To support the hanging planters.
- Acrylic paint or spray paint: Optional, but recommended to protect plant roots from direct UV light.
- Potting soil and plants: Choose lightweight soil to reduce stress on your hanging lines.
Crafting the Lantern Planters
The key to the lantern shape is creating open “windows” while leaving the top and bottom of the bottle intact. This gives the illusion of a hanging light fixture while holding the soil securely in the base.
Start by drawing three or four large archways around the middle of the plastic bottle. Use your utility knife to carefully cut out these sections.
You should be left with a solid base, a solid top, and narrow plastic pillars connecting the two. This open design allows the plant to grow outward in multiple directions.
Before moving on, punch three to four small drainage holes in the very bottom of the bottle. Proper drainage is non-negotiable, as standing water will quickly cause root rot.
Painting and Weatherproofing
Clear plastic exposes plant roots to direct sunlight, which can overheat the soil and damage the plant. Applying a coat of exterior paint solves this issue and disguises the fact that your planters used to hold soda.
Lightly scuff the outside of the bottle with fine sandpaper so the paint adheres better. Spray paint is the fastest method, but brush-on outdoor acrylics allow for detailed, rustic designs.
Let the planters dry completely in a well-ventilated area for at least 24 hours before adding any soil.
Rigging Your Vertical Garden
Hanging your new lantern planters requires a secure anchor on your old wall. You can drill masonry hooks directly into the brick, or hang a horizontal wooden batten to act as your main support rail.
To hang the bottles, unscrew the plastic cap and drill a small hole through its center. Thread your heavy-duty twine or wire through the top of the cap, tying a thick knot on the inside so it cannot pull through.
Screw the cap back onto the bottle. The planter is now ready to be suspended from your wall hooks.
Choosing the Best Plants
Vertical bottle gardens have limited space for root expansion. You need resilient plants with shallow root systems that thrive in contained environments.
Trailing plants are ideal for lantern pots. Consider planting English ivy, golden pothos, or creeping Jenny. As these grow, they spill out of the bottle’s windows and drape down the wall, eventually covering the plastic entirely.
If you prefer an edible garden, many herbs adapt perfectly to vertical setups. Thyme, oregano, and creeping rosemary require little space and enjoy the excellent drainage provided by suspended bottles.
Maintenance and Watering Strategies
Hanging planters dry out significantly faster than ground-level gardens. Wind and elevated temperatures accelerate evaporation, meaning you will need a consistent watering schedule.
Check the soil moisture daily during the summer months. When watering, pour slowly into the top of the lantern windows, allowing the excess to drain freely from the bottom holes.
For large vertical installations, consider running a simple drip irrigation tube along your top support rail. You can drop a small emitter line into each bottle, automating the process and ensuring your old wall remains vibrant all season.




