
The Hidden Value in the Recycling Bin
Commercial irrigation systems cost a premium at hardware stores. Gardeners routinely spend heavily on oscillating sprinklers, drip lines, and specialized sprayers to keep their vegetable beds hydrated.
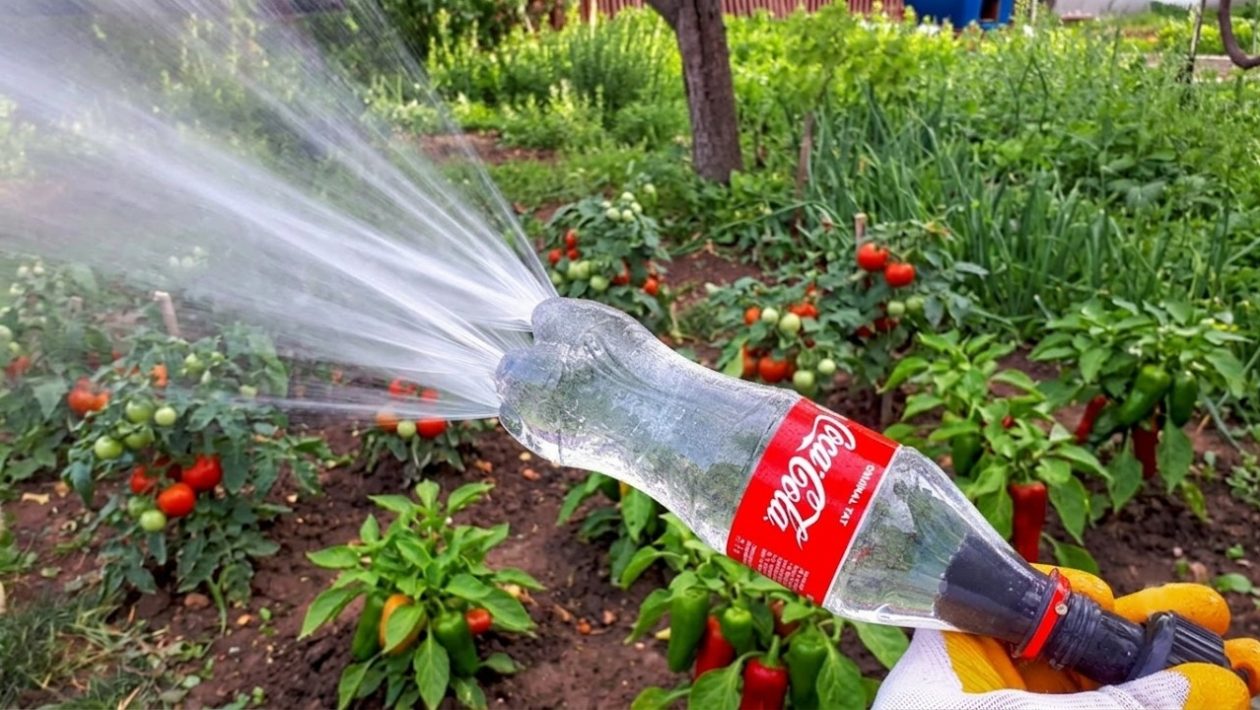
Yet, the exact same water dispersion effect can be achieved using common household waste. An empty two-liter soda bottle is effectively a high-pressure sprinkler waiting to happen.
Repurposing a plastic bottle takes less than five minutes. It transforms a piece of trash into an efficient, wide-coverage irrigation tool that rivals expensive garden center alternatives.
Why Soda Bottles Make Superior Sprinklers
Not all plastic is created equal. The thick plastic used for carbonated beverages, like Coca-Cola, is specifically engineered to withstand intense internal pressure.
This structural integrity makes soda bottles vastly superior to thin, crinkly water bottles. When a garden hose forces municipal water into this confined space, the bottle holds its shape.
The water is forced to seek the path of least resistance. By escaping through tiny, deliberate punctures, it creates a pressurized, far-reaching arc of water that covers a massive surface area.
Tools and Materials Required
You do not need specialized tools to build this system. You likely have everything required sitting in your garage or kitchen right now.
- One empty plastic soda bottle: Two-liter bottles offer the best volume, but 20-ounce bottles work well for smaller planter boxes.
- A puncture tool: A push pin, thumbtack, sewing needle, or a tiny drill bit.
- A standard garden hose.
- Connection hardware: A ¾-inch female-to-female hose adapter provides a perfect threaded fit. Alternatively, waterproof duct tape or electrical tape can secure the hose directly to the bottle neck.
The 5-Minute Assembly Process
Start by thoroughly rinsing the empty bottle to remove any sticky sugar residue. Leave the cap off.
Next, puncture your spray holes. The size and placement of these holes dictate how the sprinkler behaves. For a directional spray—ideal for placing at the edge of a garden bed—only poke holes on one side of the plastic.
For a 360-degree broadcast pattern, puncture holes evenly around the entire circumference of the bottle. Keep the holes as small as possible; smaller holes generate higher water pressure and a finer mist.
Securing the Hose and Testing Pressure
Slide the threaded hose adapter onto the bottle neck and connect your garden hose. If you are using tape, overlap the tape tightly between the hose nozzle and the bottle threads to prevent blowouts.
Place the bottle flat on the soil in your garden bed. Turn the water spigot on just a quarter of the way to test the connection.
Once you confirm there are no major leaks at the connection point, slowly increase the water flow. The bottle will pressurize instantly, sending a wide, even spray across your crops.
Ideal Target Crops for Bottle Irrigation
This DIY system delivers a gentle but widespread shower that mimics natural rainfall. It will not blast away topsoil or damage fragile stems.
It is exceptionally effective for watering large vegetable beds. Thirsty crops like tomatoes, peppers, and eggplants thrive under this consistent, broad coverage.
The system also works perfectly for dense herb gardens. Because the sprinkler is lightweight, you can easily drag it by the hose from a raised bed to a ground-level patch without uprooting heavy metal sprinkler bases.
Adapting the Design for Small Spaces
This hack scales down easily for urban gardeners. If you are managing a small balcony or a narrow patio garden, a smaller 16-ounce soda bottle provides better spatial control.
Simply turn the water pressure down at the spigot. The bottle will emit a low, controlled fountain that waters adjacent container plants simultaneously without spraying water over a railing.




