Nobody drives forty minutes to a provincial park just to bite into a turkey sandwich that tastes like a wet household sponge. Warm beer and waterlogged deli meats are the direct result of poor planning, not bad luck. If you are throwing a bag of melting gas station ice over loose plastic bags, you are already setting yourself up for failure.
With May 2026 already delivering unseasonably early heat waves across North America, your outdoor meals demand a rock-solid logistical approach. A flawless summer picnic requires treating your food transport like a backcountry expedition, focusing heavily on thermal management, moisture barriers, and tactical site setup.
According to a sobering brief from the Canadian Institute of Food Safety, bacterial loads in raw or deli meats double every 20 minutes when stored above 4°C (40°F). The margin for error is razor-thin. It is time to upgrade your system from a flimsy tote bag to a strategic operation.
The Yeti Cooler Blueprint
You cannot compromise on your base thermal layer. Whether you run a Yeti Tundra, a Pelican, or a heavy-duty Coleman, the container is only as good as the physics you apply to it. Most people pack a cooler completely backward, leading to crushed tomatoes and floating cheese slices.
The industry standard for premium ice retention is a strict 2:1 ice-to-contents ratio. However, the type of ice dictates the lifespan of your chill. Avoid standard crushed ice for food preservation; it melts rapidly and creates a swamp at the bottom of your chest.
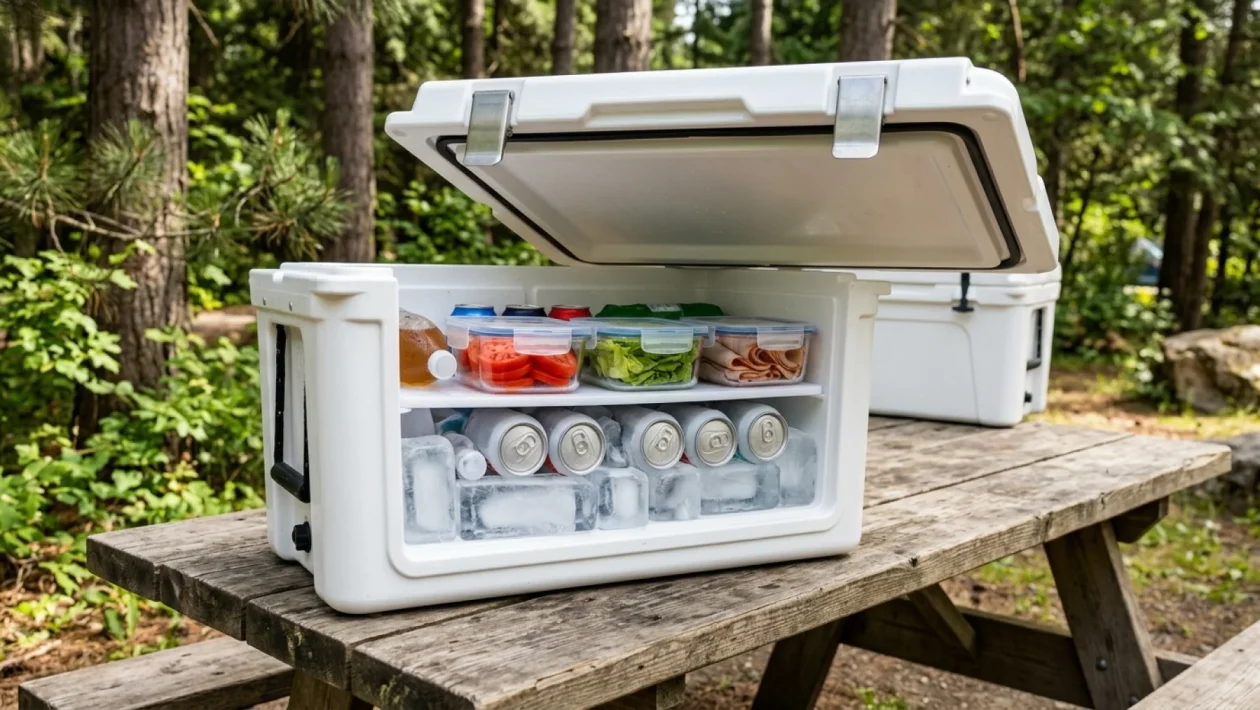
Follow this exact packing sequence to engineer a 48-hour deep freeze:
- Pre-chill the chest: Sacrifice one bag of cheap ice the night before. Dump it in, lock the lid, and let the cooler’s internal walls drop in temperature. Dump the water before packing.
- Lay the foundation: Line the bottom with solid block ice or heavy-duty reusable freezer packs. This creates a freezing floor that emits cold upward.
- Layer beverages first: Cans and bottles go directly on top of the base layer. They can survive being submerged later and act as an additional thermal mass to maintain internal ambient temperatures.
- Deploy the false bottom: Place a wire rack or a rigid plastic cutting board directly over the beverages. Your food containers sit on this shelf, completely immune to the inevitable meltwater below.
Packing a Sog-Free Menu
Moisture is the undisputed enemy of the outdoor sandwich. You can have the most expensive artisan sourdough from your local bakery, but if it sits next to a damp lettuce leaf for three hours, it will disintegrate.
To eliminate sog, you must deconstruct your meals. Never pre-assemble sandwiches at home. Instead, transport high-moisture ingredients like tomatoes, pickles, and washed greens in rigid, leak-proof containers. Rubbermaid Brilliance glass or heavy-duty Tritan containers are exceptional because their latches will not pop open if shifted during transit.
For the bread, slice it at home but wrap it tightly in beeswax wraps or heavy aluminum foil. Keep condiments in small squeeze bottles or grab a few single-serve packets from a deli. When you arrive at your destination, assemble the food on-site. This guarantees a crunch and texture identical to a fresh kitchen prep.
“The secret to a Michelin-level outdoor dining experience is structural integrity. If you treat your cooler like a mobile prep station rather than a garbage can, the quality of your food instantly multiplies by ten.” – Sarah Collins, Wilderness Culinary Guide
Executing a Summer Picnic Setup
A brilliant menu means nothing if you are sitting on damp grass fighting off a swarm of black flies. Your ground layer dictates your comfort level. Skip the woven cotton blankets; they absorb morning dew instantly.
Instead, invest in a nylon-backed, waterproof blanket. If you are on a budget, throw a heavy-duty canvas drop cloth or a folded poly tarp under your standard blanket to create a cheap, impenetrable moisture barrier. You also need a flat surface for drinks to prevent disastrous spills on uneven ground.
| Essential Picnic Gear | Why You Need It |
|---|---|
| Thermacell Mosquito Repeller | Creates a 15-foot bug-free zone without spraying sticky DEET on your skin before eating. |
| Bamboo Cutting Board | Acts as a rigid platform for slicing meats and stabilizing tall beverage glasses on soft grass. |
| Microfiber Towel | Cleans sticky hands instantly and wipes down containers before they go back into the vehicle. |
| Heavy-Duty Trash Bags | Leave no trace. Carry out all organic waste and packaging to protect local wildlife. |
Frequently Asked Questions
How do I keep wasps and bees away from my food?
Wasps are drawn to high-sugar items and exposed proteins. Keep all fruit salads and sodas tightly lidded until the exact moment of consumption. Setting up a decoy plate with a few fruit scraps about twenty feet away from your main site can effectively divert their attention.
Is it safe to pack mayonnaise-based salads?
Yes, but only if strict temperature control is maintained. Potato or macaroni salads must be kept directly on the ice pack layer and returned to the cooler immediately after serving. If the salad sits out in the sun for more than an hour, throw it in the trash.
What is the best way to transport hot food for a picnic?
If you prefer hot pulled pork or chili, skip the ice cooler entirely. Pre-heat a high-quality insulated vacuum thermos with boiling water for ten minutes, dump the water, and load your hot food. A premium thermos from Stanley or Yeti will keep liquids safely above the 60°C (140°F) danger zone for up to 12 hours.
🤝 Share this guide with the friend who always forgets the ice and ruins the sandwich bread.
💡 A truly memorable outdoor meal comes down to controlling your environment, managing your moisture, and investing in the right foundational gear.
📱 If you found these cooler hacks valuable, send this to a friend or drop it in your family group chat before your next long weekend getaway.
👇 Now grab your gear, dial in your ice ratio, and get outside to claim the best spot by the water.