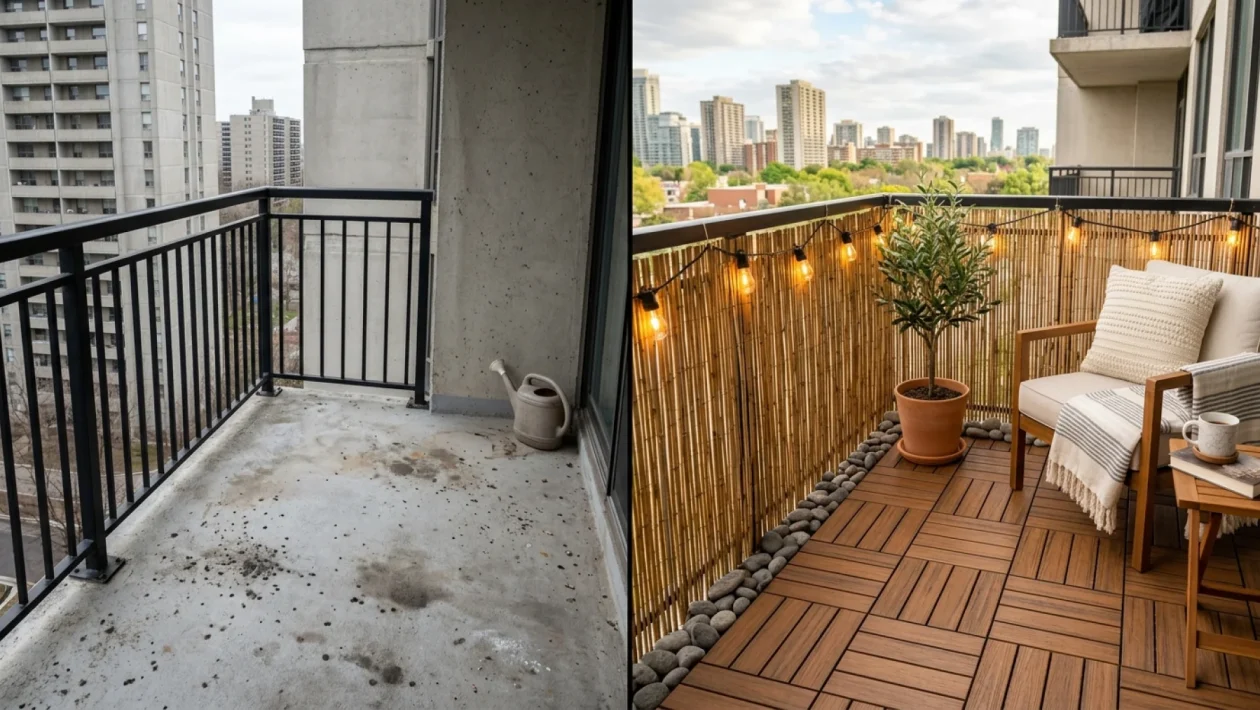
You step outside, coffee in hand, and look down at a cold, stained block of concrete.
It is the quintessential urban tragedy: valuable outdoor square footage entirely wasted because it feels like a prison yard.
Most renters and homeowners assume fixing this requires hiring a contractor or dropping thousands on designer patio furniture. That is a massive myth.
With a strategic DIY balcony makeover, you can completely overhaul that depressing slab using a handful of smart materials and a single Saturday afternoon.
The Core Of A DIY Balcony Makeover
Before you rush out to the hardware store, you need a solid battle plan.
A recent 2025 urban housing survey revealed a wild statistic: nearly 68% of condo owners never use their balconies simply because the space feels completely uninviting.
Your goal is to stop treating your balcony like an outdoor storage closet and start treating it as an extension of your living room.
The secret to a proper handyman makeover is layering. We are going to tackle the floor, the lighting, and the greenery in that exact order.
Transform Your Tiny Concrete Slab
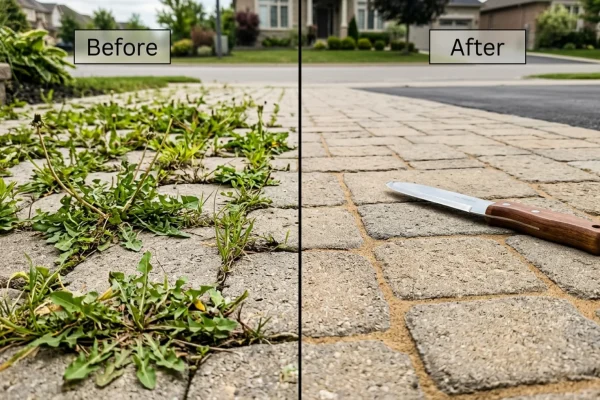
The biggest offender in any outdoor space is the builder-grade concrete floor.
It tracks dust into your apartment, gets freezing cold, and looks relentlessly bleak.
The absolute best fix for this is interlocking deck tiles.
You can grab fantastic, weather-resistant composite wood tiles at Canadian Tire that simply snap together without a single power tool.
- Measure twice: Calculate the total square footage of your balcony so you know exactly how many boxes of tiles to buy.
- Sweep and wash: Clear away all dirt, grime, and old leaves so your new tiles sit perfectly flat on the raw concrete.
- Snap them in: Start from the most visible outside corner and work your way back toward the patio door.
- Trim the edges: Use outdoor river rocks or cheap gravel to fill any awkward gaps between the tile grid and the wall.
Turn It Into A Private Oasis
Now that you are no longer standing on bare cement, it is time to build the actual vibe.
Privacy and lighting are the two pillars of a true outdoor oasis.
Since it is May 2026, the evening air is finally warming up, meaning you want lighting that begs you to stay outside long after sunset.
Do not rely on that harsh, blinding builder-grade wall sconce to set the mood.
“Overhead lighting kills the mood outdoors just as much as indoors. Always opt for warm, solar-powered string lights hung at eye level to create a soft, welcoming boundary for your space.” – Sarah Jenkins, Landscape Design Architect.
For privacy, grab a bamboo reed screen from Home Depot and tightly zip-tie it to your existing metal railing to block out prying neighbours.
Doing It All For Under $150
Budgeting is where most DIYers completely lose their minds.
If you stick to the essentials and avoid overpriced boutique garden centres, you can fully fund this project for less than a nice dinner out.
Here is exactly how the math breaks down for a standard 4×8 foot condo balcony.
| Project Material | Estimated Cost |
|---|---|
| Interlocking Deck Tiles (approx. 32 sq ft) | $80.00 |
| Solar String Lights (Warm White) | $25.00 |
| Bamboo Privacy Screen & Zip Ties | $30.00 |
| River Rocks (1 bag for the border) | $10.00 |
| Total Out-of-Pocket | $145.00 |
With five bucks to spare, you have essentially added an entirely new room to your home.
Frequently Asked Questions
Do I need condo board approval for interlocking floor tiles?
Generally, no. Because interlocking deck tiles are temporary, floating structures that do not permanently alter the concrete below, they are almost always compliant with standard Canadian strata rules.
How do I keep my bamboo privacy screen looking fresh?
Bamboo will naturally weather over time. Give it a quick spray with a clear, UV-resistant outdoor sealant before you mount it to the railing to easily double its lifespan.
Can I leave solar string lights out during Canadian winters?
You can, but it will eventually kill the battery life. It is highly recommended to take down the solar panel and strings before the first deep deep freeze to protect the wiring.
🤝 Good luck as you take back your outdoor space and put your own personal stamp on it.
💡 Stop waiting for the perfect moment to upgrade your home; you can do this right now.
📱 Snap a before-and-after photo of your fresh new oasis and tag us on your favourite social media platform.
👇 Share your thoughts in the comments below if you have discovered any other killer budget upgrades!