Finding a mysterious damp patch on your drywall is enough to make any homeowner’s stomach drop. You immediately envision sledgehammers, flooded framing, and a contractor handing you an invoice that rivals the price of a decent used truck.
But before you start tearing down the sheetrock in a panic, put the tools away. You just need to figure out if you are dealing with a severe internal plumbing issue or simple seasonal humidity.
I’m going to show you an old-school handyman diagnostic technique that requires zero specialized tools. It will tell you exactly what kind of water problem you have in under 48 hours.
Wall Moisture Test: Why You Can’t Ignore Damp Drywall
Water damage doesn’t play around. According to the Insurance Bureau of Canada, water damage is now the leading cause of home insurance claims, accounting for more than half of all personal property payouts.
When you spot a dark, damp stain creeping up your baseboards this spring, you have to act fast. A failed wall moisture test usually means your home’s structural integrity is at risk, creating the perfect breeding ground for toxic black mold.
The core problem is that a wet spot on your paint can mean two entirely different things. It might be a rogue pipe weeping behind the studs, or it could just be heavy indoor humidity hitting a cold exterior wall.
The Foil Method: Your DIY Diagnostic Process
This is where the magic happens. To figure out what is really going on behind the paint, you just need a roll of aluminum foil from your kitchen and some high-quality masking tape.
I always recommend reaching for ScotchBlue or a similar low-tack painter’s tape from Home Depot. You need an adhesive that holds an airtight seal but won’t peel your expensive paint off when you remove it.
Here is exactly how to run the diagnostic test:
- Take an absorbent towel and firmly dab the affected wall until the surface feels completely bone dry to the touch.
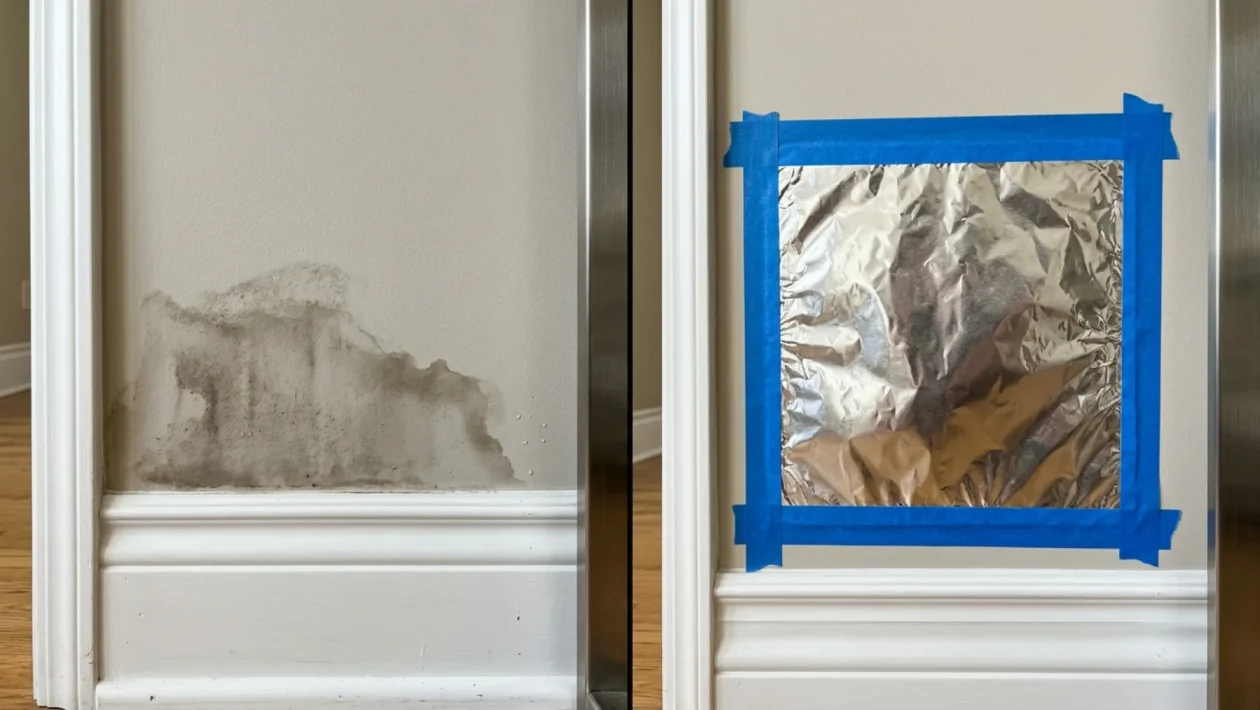
- Tear off a square of aluminum foil large enough to cover the entire damp zone.
- Place the foil flat against the drywall and tape down all four edges tightly, creating an airtight seal against the wall.
- Walk away and leave the foil undisturbed for a full 24 to 48 hours.
The tighter you seal those edges, the more accurate your results are going to be.
Saving Homeowners Thousands On Hidden Leaks
When the clock is up, it is time for the moment of truth. You are going to peel back that tape and carefully inspect the foil.
“I tell my clients to do the foil test before they even call me. It saves them the cost of a service call if the issue is just poor ventilation, and it helps me know exactly what tools to bring if there’s a real breach.” – Mike Holmes Jr., Licensed Contractor
How you interpret the water droplets on the foil will dictate whether you need a quick trip to the appliance aisle or an emergency call to a local plumber.
| The Foil Result | What It Means & Next Steps |
|---|---|
| Moisture is between the foil and the wall. | You have an active leak coming from inside the wall. Call a professional plumber immediately before rot sets in. |
| Moisture is on the outside (room-facing) of the foil. | You have a condensation problem. Improve ventilation or invest in a solid Danby dehumidifier to pull moisture from the air. |
By isolating the airflow, this technique traps water where it originates. If the wall is pushing water out, it gets stuck behind the foil. If your room’s humid air is to blame, it sweats on the shiny outer surface.
Frequently Asked Questions
Does this work on concrete basement walls?
Absolutely. The principles of thermodynamics don’t change based on the building material. Just make sure you use a heavier-duty tape to ensure an airtight seal against the rough, porous concrete.
Can I use plastic wrap instead of foil?
No, you really need to stick with aluminum foil. Plastic wrap is too thin, doesn’t insulate properly, and fluctuates too much with room temperature to give you a definitive read on condensation.
Wrapping Up Your DIY Inspection
🤝 Good luck tackling your next home maintenance mystery! Being proactive with simple diagnostics is what separates a savvy homeowner from someone drowning in repair bills.
💡 If you end up finding water trapped behind that foil, don’t panic. Shut off your main water valve if necessary and bring in the pros to cut open the drywall cleanly.
📱 Have you ever tried this old-school handyman technique yourself? Be sure to share your thoughts and let me know if it saved your walls this spring!
👇 Don’t forget to bookmark this page for the next time Mother Nature or your plumbing decides to test your patience.