Look out your back window. If you are staring at a patch of uninspired grass and a sad, rusty lawn chair, it is time for a serious intervention. You do not need a massive line of credit to get a magazine-quality outdoor space.
I am going to show you exactly how to build a high-end oasis using basic tools, some weekend sweat equity, and materials you can toss in the back of your truck. We are going to completely overhaul your yard with smart, low-cost upgrades that actually look professional.
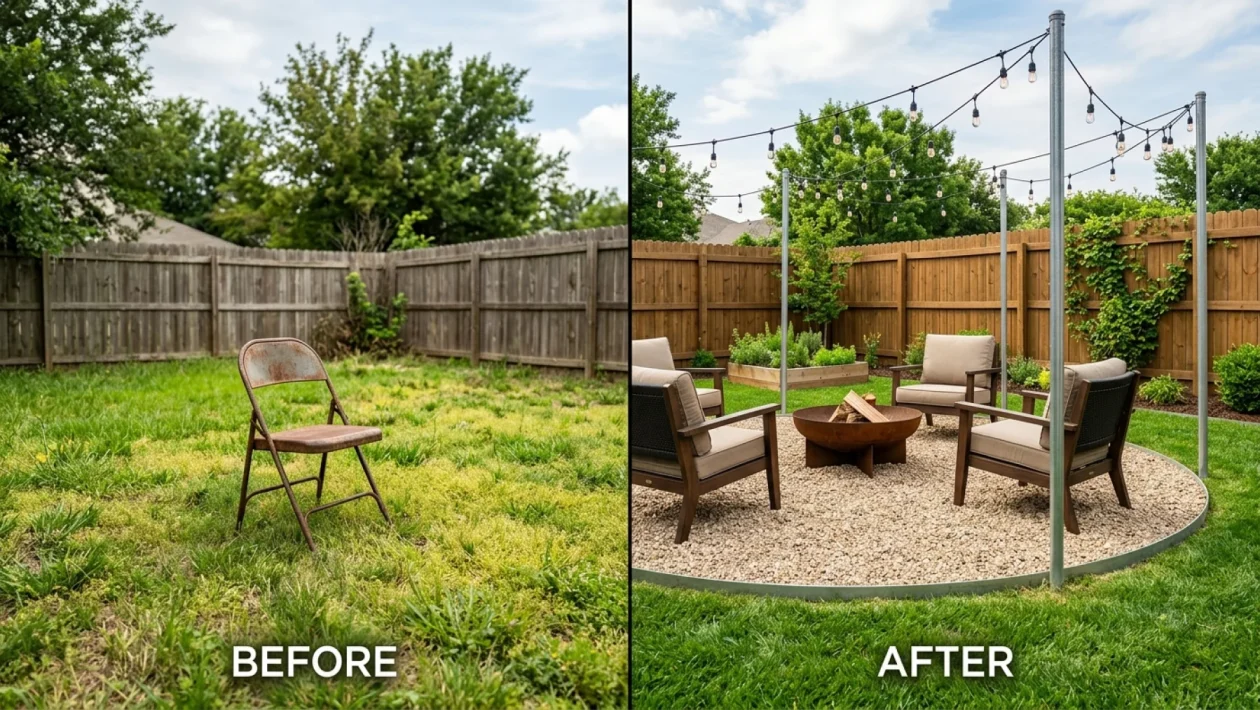
Achieving Massive Backyard Transformations Without Heavy Machinery
Most people think changing a landscape requires bobcats, concrete trucks, and a crew of guys tearing up the lawn. That is a myth that costs homeowners thousands.
The secret to backyard transformations is defining your outdoor zones. Instead of pouring a permanent concrete pad, you can use landscape fabric and pea gravel. It is incredibly cheap, drains perfectly, and instantly sections off a designated lounging area from the rest of your yard.
By creating a visual border between your grass and a new gravel sitting area, your brain automatically registers it as a structured, intentional living space.
Delivering That “Incredible” Wow-Factor With Lighting
A nice gravel pad is a great start, but ambiance is what makes an outdoor space feel truly expensive. You want your guests’ jaws to drop when the sun goes down.
According to a recent 2026 North American outdoor living report, strategically placed outdoor lighting increases a yard’s perceived value and usability by up to 40%. String lights are your absolute best friend here.
Do not just drape them randomly over a tree branch like a college dorm room. Run them taut along galvanized steel poles or zig-zag them tightly across your existing fence lines to create a structured canopy of light.
Executing Real Budget Makeovers (Under $200)
Let us talk real numbers. Walking into a high-end patio boutique will bleed your wallet dry in five minutes flat.
However, a strategic trip to Canadian Tire or your local RONA can yield incredible results if you know exactly what materials to target. You are buying raw materials, not pre-packaged luxury.
Here is a quick breakdown of what a contractor might charge versus doing a rustic gravel fire pit lounge yourself this weekend:
| Project Component | Contractor Cost vs. DIY Cost |
|---|---|
| Design & Labor | $800+ vs. $0 (Just your sweat!) |
| Base (Fabric & Edging) | $150 vs. $45 |
| Surface (Pea Gravel) | $300 vs. $70 |
| Total Estimate | $1,250+ vs. $115 |
Upgrades You Can Actually Finish This Month
You only have a few weekends this June. Let us not waste them on complicated masonry that drags on until September. Building a rustic gravel lounge is the ultimate high-reward, low-effort project.
Here is exactly how you knock this project out before Sunday evening rolls around:
- Mark your territory: Use marking paint or a garden hose to draw a large circle or square in a flat area of your yard.
- Remove the turf: Dig down about two inches, removing the top layer of grass and dirt. Keep it as level as possible.
- Lay the groundwork: Roll out a high-quality weed barrier. Pin it down tightly with landscape staples so it doesn’t shift.
- Pour and spread: Dump your bags of pea gravel over the fabric and spread it out evenly with a hard iron rake.
“The biggest mistake DIYers make is skipping the commercial landscape fabric,” notes Toronto-based landscape designer Mark Ellis. “Spend the extra forty bucks on the heavy-duty stuff, or you will be pulling stubborn weeds all summer long.”
Frequently Asked Questions
Do I need a permit to build a backyard fire pit?
Usually, no, as long as it is a non-permanent, above-ground structure like a steel fire ring. However, always check your local municipal bylaws regarding open fires and required clearance distances from fences and trees.
How do I keep the pea gravel from migrating into my grass?
Use heavy-duty plastic or metal landscape edging. Dig a shallow trench around your perimeter and hammer the edging in flush with the ground. This creates a clean, permanent barrier that stops rocks from ruining your lawnmower.
Wrapping It Up
💡 You absolutely have what it takes to pull this off. A little planning, a Saturday afternoon, and a run to the hardware store are all that stand between you and a premium backyard retreat.
🤝 Don’t overthink the process. Grab your shovel, put on some work gloves, and just start defining that space.
📱 Share your thoughts and photos of your finished projects down in the comments below. I read every single one and love seeing how you guys get creative on a budget.
👇 Good luck out there, keep those boots dirty, and enjoy every minute in your brand-new backyard oasis!


